Sunday, December 29, 2013

Farmhouse Renovation - Completion of the Septic

After much anticipation, work on the septic began.  Our yard resembled more of an equipment yard than the usual grassy field.  Good thing we realized our yard was going to get beat up before things started!  We knew it was serious when the large excavator showed up!!


This picture is just before all the digging began.


First, they dug a trench for the 4" PVC drain pipe from the house to the tank which is about 100 feet away.  Then, they dug a huge hole for the tank.  The tank itself is about 5' in depth, buried about 4' underground, so the hole was 8' deep.

The tank was delivered on a large boom truck, manufactured locally at Wieser Precast.   This tank is 2250 gallons and is made from concrete.  The sizing of tanks is dependent upon the number of bedrooms in your house and whether or not you have a garbage disposal.  A garbage disposal increases the tank size by 750 gallons!  This tank has a baffle in the middle.  1,500 gallons of the tank receives all the waste water from the house.  As the water nears the top of the tank, it passes through a filter before pouring into the secondary tank.  By the time the water passes into the secondary tank, all the solid material has settle out, leaving "grey water" as it is called.  This secondary tank has a pump which pumps the liquid into the drain field periodically.


Here it is being lifted into place.


Here is the tank set into place, making the final connection to the PVC pipe from the house.


For serviceability, manhole type extension rings are added so that you can access the tank being the top of it is buried 4' or so.  Here it is installed.


Then, everything was back filled leaving only the three lids showing.


Finally, the drainfield was constructed.  It measures about 20' wide and 90' long and is made up of 4' of sand covered by 1' of dirt (FYI, that's a lot of sand!  It took a whole day of driving the dump truck back and forth to the quarry for them to have enough)!  Buried in the sand are three rows of baffles with PVC pipes inside.  When the pump turns on to empty the septic tank, the effluent is dispersed into these lines where it is slowly absorbed back into the ground.  Here you can see a fairly good cross section of the drain field as it is being buried.


And, there you have a septic system!  I don't have a completed picture of the mound, but it is basically as the name implies - a large long mound of dirt!

That's it for now.  Stay tuned to see the footing and foundation come to life!

Monday, September 30, 2013

Farm House Renovation - Day 1

Day 1 of the addition journey (well, in terms of this blog, anyway).  Much of the work below was completed over the past few weeks, but today is what Erin and I are calling day 1.

The first task to get checked off our renovation list is a new septic system.  For those of you who don't know what a septic system is, it is a self contained treatment system for all the waste water in your home. Whether you wash your hands or wash clothes, or use the bathroom, that water has to go somewhere.  In areas outside of the city where there is no sewer system, a septic system collects this water in a large tank where the sediment in the water settles out.  The grey water or "effluent" as it is called in the septic industry is then pumped out into a large mound where it drains over a bed of sand and eventually, into the ground water.  The effluent itself is practically clear and fairly clean.  By the time it filters through the sand in the mount, it is very clean.  Here is a simple diagram.


For our specific septic installation, we have 2 tanks - one that collects the raw sewage and one downstream that houses the pump and collects the grey water.  Our main tank is 2250 gallons, which is quite a large tank.  The secondary pump tank is about 750 gallons. 

Anyway, enough said about the septic.  To get ready for this, we had to clear an area overgrown with weeds, trees, vines, etc.  Here is what it looked like post-clearing.


To accomplish this, my brother came up with the Swishaw - which is a Swisher walk behind string trimmer that has a 10" saw blade modified to fit it.  Check out this awesome video - the thing annihilates brush!


With that out of the way, I started working on dis-assembling about 1/2 of the large deck we had on the house.  The demolition did not phase Erin - she was just chilling working on her crocheting. 


Next on the list was digging up the propane line to the house.  I thought this would have been buried deeper, but it was only about 6" underground and came up easily.  I did find out how easy the soft copper kinks though - this required a quick trip to Menards and putting a splice on the line in the dark so that we could have hot water!  Notice my fuel for this task - in the form of a brewed beverage on the tank!


Finally, the septic installer is also going to dig the footings, so I had to lay those out so he could dig them.  Below is the outline of the addition - it is huge when you spray paint it out on the grass!


Notice that there is a not so conveniently a large tree right in the middle of the footing!  The arborist had said this tree was at the end of its life anyway, so I didn't feel too bad having to take it out. 

Well, that's it for now.  Day 2 will bring the installation of the septic system. 

Dan & Erin

Farm House Renovation - The Plans


Day 1 of the addition to our lovely 1880 farm house officially commences this week.  Nothing like waiting all summer to finalize the plans and start the first week of October!  But, hey, we're Minnesotans - 40 degrees out laying block, bring it! 

A little background on the house.  The title documents state the house (or some form of it) was built in 1880.  It has been added onto likely twice - based on what I have deduced in my various attic excursions.  The house is sitting on a newer concrete block foundation with a new slab - no stone walls and dirt floor here!  When this work was done (guessing in the 80's), the house was also moved from its previous resting place, which now has three great apple trees growing on it.  So, the house had a lot going for it - and the structure was one of the main reasons we were comfortable purchasing this old, and then foreclosed house.  Yes, it is not pretty or shiny new, but it has potential and has a great spirit about it!


We spent the past spring/summer planning our addition.  The main purpose of the addition is to provide an attached garage as my lovely wife doesn't have to tramp through the snow and so my shiny pickup has a place to call home.  On the back of the garage, we tacked on a nice mudroom, large pantry, and powder room.  Behold, the main floor plan!


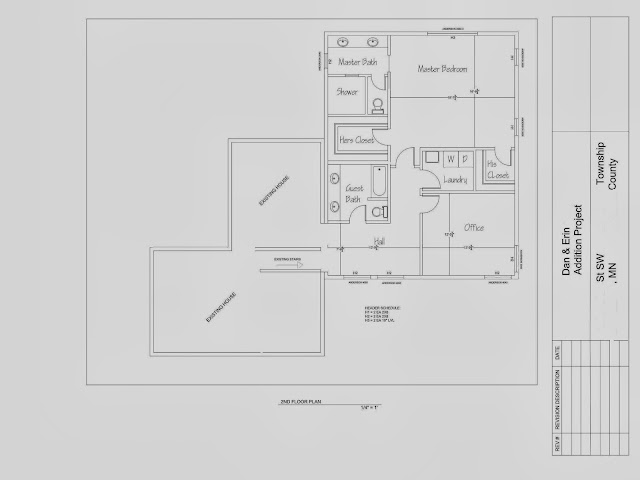
We also wanted a master suite as well as a second bathroom on the 2nd floor - there are currently three bedrooms with no bathroom up there.  I will admit that it isn't fun to navigate the steep, narrow stairs when you are half awake to get to the bathroom.  We were left with some extra room, so we added an office/potential bedroom.  On the top of my wife's want list was a 2nd floor laundry room, so we accomodated that as well.  Behold, the 2nd floor plan!


When you look at it on paper, our addition seems to dwarf the original house!  But, you have to remember that the bulk of the square footage on the main floor is garage. 

Our plan for the remainder of 2013 is to get a new septic system installed, excavate and pour the footings, and build the new concrete block foundation walls.  We will then backfill it and wait until the warm weather makes its visit in the spring.  The advantage to doing this work now is that we can hit the ground running in the spring and not have to wait for the ground to thaw out/dry out to get started.  We could begin framing this year and work through the winter, but that would be brutal!

Anyway, join us through our remodeling adventure to turn this awesome old farm house into an updated country-modern home.

Dan & Erin